Powershell Objects
PowerShell takes advantage of the underlying .Net framework, using objects instead of text.
Objects in .Net are much the same except for two small differences: the "Parts" are called properties and the "Instructions" are called methods. If we wanted to represent a Windows Service as an object.
Creating PowerShell custom objects is a common task that someone find hard to do. I will show you a sample code to create custom objects.
Creating Custom Objects Using Add-Member
First, let's use Add-Member to create our objects.
$obj=New-Object PSObject
$obj | Add-Member Noteproperty -Name Name -value "Van Don"
$obj | Add-Member Noteproperty -Name Title -value "PowerShell Tutorial"
PowerShell Parameters, Objects, and Formatting
Welcome back! Continuing with your PowerShell Training, the goal of this
tutorial is to introduce PowerShell parameters, objects, and formatting
output. I'm excited about this tutorial as we begin to define and discover
the power of working with objects in PowerShell. By the end of this
PowerShell training session you should have a good understanding of what an
object is, how we gather information, and how changes are made in the
environment.
Launch PowerShell and let's get started...
Common Parameters (options for cmdlets)
As mentioned before, the standardization of the PowerShell syntax has
reduced the learning curve. Cmdlets follow a standard "Verb-Noun" naming
convention and also use common parameters. Note: not all cmdlets use these parameters. However,
because the PowerShell engine interprets the parameter (not the cmdlet),
each common parameter is enacted in the same fashion. Below is a list of
the Common Parameters:
-
-whatif
- Cmdlet is not actually executed, provides information about "what
would happen" if executed.
-
-confirm
- Prompt user before executing cmdlet.
-
-Verbose
- Provides more detail.
-
-debug
- Provides debugging information.
-
-ErrorAction
- Instructs cmdlet to perform an action when errors occur. Such as:
continue, stop, silently continue, and inquire.
-
-ErrorVariable
- Use a specific variable to hold error information. This is in
addition to the standard $error variable.
-
-OutVariable
- Variable used to hold output information.
-
-OutBuffer
- Hold a certain number of objects before calling the next cmdlet in
the pipeline.
To view common and other parameters available to the "Set-ExecutionPolicy"
cmdlet, type the following at the command prompt:
Set-ExecutionPolicy -<tab>
You can cycle through available parameters, for a cmdlet, by continually
pressing the "tab" key. Make sure you are using the dash "-" before
pressing tab.
Note: not only will you see common parameters but, other parameters
that are available as well.
Use the "Get-Help" cmdlet for information on parameters available to a
cmdlet. Continuing to use the "Set-ExectutionPolicy" cmdlet, let's
get-help:
Get-Help Set-ExecutionPolicy -Full<enter>
In the "Parameters" section, which provides information on parameters
available to the cmdlet, there is a list of the common parameters the
cmdlet supports.
Examples:
1. In this example, let's use the -whatif parameter to see
"what would happen" if we used the "Set-ExecutionPolicy" cmdlet:
Set-ExecutionPolicy Unrestricted -whatif<enter>
You are presented with the following:
Performing operation "Set-ExecutionPolicy" on Target "Unrestricted".
This is really cool... before you commit any changes you can verify that the
cmdlet is going to do what's expected. Would have been great if "Format C:" had a -whatif parameter.
2. Using the same cmdlet, choose the -confirm parameter to
prompt before executing:
Set-ExecutionPolicy Unrestricted -confirm<enter>
Are you sure you want to perform this action?
-
[Y] Yes (Default is "Y")
-
[A] Yes to All
-
[N] No
-
[L] No to All
-
[S] Suspend
-
[?] Help
Note: Suspend?
This option is very useful. Let's say you are not sure you want to execute
the cmdlet because you are not sure what the "ExecutionPolicy" is set to.
You can verify the "ExecutionPolicy" before committing the change:
Set-ExecutionPolicy Unrestricted -confirm<enter>
Are you sure you want...
S<enter> (places the prompt in suspend mode as denoted by ">>").
>>Get-ExecutionPolicy<enter>
Resricted (or whatever the policy is set to).
>>exit<enter>
(Typing "exit" leaves suspend mode and returns to the original command)
Are you sure you want...
Y<enter> (Confirms "Yes" and sets the ExecutionPolicy to "Unrestricted").
We've covered a few examples of what you can do with parameters. Since you
know how to "Get-Help" for a cmdlet, it's easy to discover which parameters
are available to any cmdlet. Do some exploring and experimentation before
moving on to the "Objects" section.
Introduction to Objects
As discussed in an earlier PowerShell tutorial, PowerShell is object-based
not text-based. Since we are working with objects, more information exists
than what's presented (by default) on the command line. That information
may not be initially visible; by using PowerShell cmdlets, parameters, and
script blocks we can interact with an object to provide us with the
information we require.
What is an Object?
An "Object" is something we can gather information from and/or perform an
action upon. An object, in PowerShell, consists of properties (information
we can gather) and methods (actions we can perform).
I don't remember where I herd the following explanation but it's one that
sticks with me. As an example, let's look at a "light bulb." The object
should be obvious, it's a light bulb. The properties of a light bulb could
be color, wattage, and type (florescent, incandescent, or halogen). Methods
are the actions we can perform on the object such as; turn on the light
bulb and turn off the light bulb. Pretty simple right! Let's look at an
object's properties and methods.
Ingrain this cmdlet in you head, you will use it constantly: " Get-Member." This cmdlet is used to examine what
properties and methods are available to an object.
Example 1. Properties and Methods of the "Get-Service" cmdlet.
Type the following to view the properties and methods of the "Get-Service"
cmdlet. In this example, the output of "Get-Service" (object) is piped into
the "Get-Member" cmdlet.
Get-Service | Get-Member<enter>
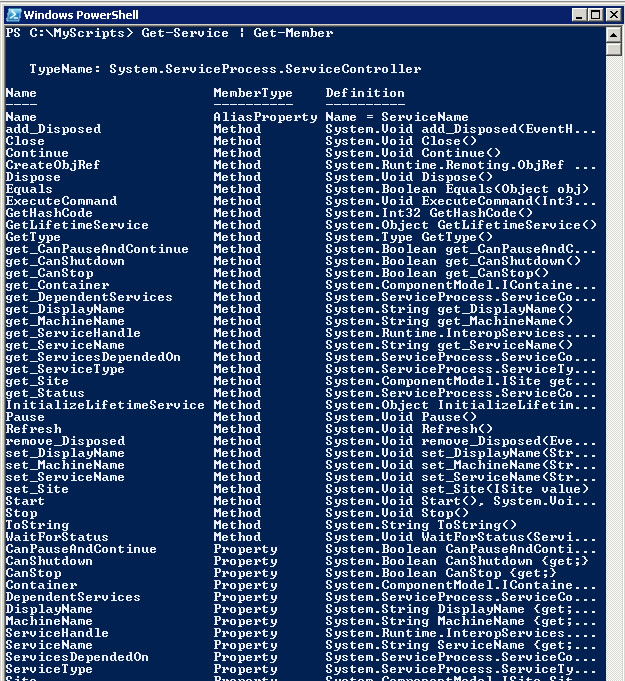
Get-Member Results
Image 4.1
You should see something similar to Image 4.1. We have identified which
properties and methods are available in the "Get-Service" cmdlet. At this
point in your PowerShell training if you are not familiar with what's in
the definition column, you are looking at "Data Types." For example, the
"CanStop" property returns a Boolen "Type." My guess is
that the value would either be "True" or "False." Don't be concerned with
this right now, we will be covering "Types" in another PowerShell tutorial.
Just make a mental note that the "Get-Member" cmdlet also returns "data
types."
Example 2. Getting Properties of the "Get-Service" cmdlet.
In this example we refine our search to display only properties by using
the -MemberType parameter.
Get-Service | Get-Member -MemberType Property<enter>
Example 3. Getting Methods of the "Get-Service" cmdlet.
Get-Service | Get-Member -MemberType Method<enter>
For a systems administrator, objects are the "Holy Grail" in managing your
environment. Why? Because everything in Windows PowerShell is an object.
Let me go off the page here for a second to explain. Since we connect to
objects and gather information (properties), we are able to compile a
report from practically any request our boss throws at us. If the boss
requests that a change (method) is made, we are able to make those changes
to one or more objects in the environment.
Here's an example: Overnight, someone has placed a large number of files on
the file server that has taken up 50% of the remaining free space. I know,
unrealistic right?!? Just follow me on this one. The boss wants a report of
all files that were created in the last day. Your answer... "No Problem."
Get-ChildItem -Path C:\ -Recurse | Where-Object {$_.LastWriteTime -gt
"08/25/2007″}<enter>
Let's dissect what the command is doing:
1. We call the "Get-ChildItem" cmdlet because we want to enumerate the file
system.
2. -Path parameter points to the root of C:\ drive as the starting point.
The -Recurse parameter means we want all subdirectories and files
enumerated.
3. The object returned from the "Get-ChildItem" cmdlet is piped into a
script block.
4. Where-Object is a looping statement which finds each object that matches
the criteria we are looking for.
What I would like you to notice
, what is "LastWriteTime"? Type the following command:
Get-ChildItem | Get-Member<enter>
Do you see a property called "LastWriteTime"? We told the command to find
each object with the "LastWriteTime" property that has a value greater than
08/25/2007. "-gt" is an operator that means greater than, we talk more
about operators in a later tutorial. I mentioned "Types" before as well,
the Definition column states that the "LastWriteTime" property is a
"System.DateTime" Type. This means it returns values of this type, which is
why we used the "DateTime" type "08/25/2007." Again, we will discuss
"Types" in a later PowerShell tutorial.
Did the method "Turn light bulb On" work? I'm hoping that this discussion
on objects is starting to paint the big picture for you. Can you think of
what type of properties and methods are associated with user objects in
Active Directory? If the boss asks for a report of all disabled users; at
this point you should recognize that "user" is an object, more than likely
it has a property which returns the status of the account, and a method to
either enable or disable it. How about properties and methods associated
with computers, printers, and security groups. We are going to get into how
we can connect to these objects and enumerate/modify them when we discuss
WMI, COM objects, and .NET. But for now, the boss wants us to format the
report we gave him in the earlier example.
Formatting output
When we execute a cmdlet we are relying on PowerShell to display results.
The "Format-" cmdlets allow us to choose which format to display results
in. To get a list of formatting options, type the following command:
Get-Command Format-*<enter>
Format-Custom
Format-List
Format-Table
Format-Wide
Format-Table
"Format-Table" cmdlet displays data in rows and columns, similar to what
you would see in an Excel spreadsheet. By default, PowerShell attempts to
format the view, but doesn't always display the best results. For example
let's format the output of the "Get-ChildItem" cmdlet for the "C:\Windows"
directory.
Get-ChildItem C:\Windows | Format-Table<enter>
I like the table format, but there seems to be too much white space
(spaces) between the columns for my taste. Fortunately, there is a
parameter -AutoSize to assist us with white space issues.
Get-ChildItem C:\Windows | Format-Table -AutoSize<enter>
O.k. maybe that wasn't what you were looking for either. As shown from a
previous example, use the <tab> key to cycle through the available
parameters for the "Format-table" cmdlet. Expierment with each available
parameters to see how format is manipulated.
Format-List
"Format-List" cmdlet displays data in... of course, a list. For example:
Get-ChildItem C:\Windows | Format-List<enter>
By default, we get the following properties: Name, CreationTime,
LastWriteTime, and LastAccessTime. The boss looks at the list and requests
the full path to the files. Use the -Property parameter to
list the "FullName" property.
Reminder: use "Get-Member" cmdlet to list the available properties:
Get-ChildItem C:\Windows | Format-List -Property FullName<enter>
If your boss is like mine, I usually hear something like... "that's great,
but now I want the full path to all files and subdirectories, creation
date, and last time a file was modified." Your answer... "No Problem!" To
enumerate multiple properties, just separate each property with a comma (,)
as shown in this example:
Get-ChildItem C:\Windows -Recurse | Format-List -Property
FullName,CreationTime,LastWriteTime<enter>
Note:
You can also use the
-Property
parameter with the "Format-Table" cmdlet to build tables, with each
property as a header.
Format-Wide
"Format-Wide" cmdlet compresses results of a list, to fit the screen:
Get-ChildItem C: | Format-Wide<enter>
The results are in list format sorted by column, similar to the old "dir
/D" command. You can customize the number of columns using the -Column number parameter:
Get-ChildItem C: | Format-Wide -Column 3<enter>
Group-Object
The "Group-Object" cmdlet allows us to format output information based on
groups. For example, there is a property call "Company" for the object
returned by the "Get-Process" cmdlet. Let's assign the "Company" property
to a group:
Get-Process | Group-Object Company<enter>
The output groups the information as follows:
· Name - Name provided by the Company property of the Get-Process object.
-
Count - The number of process running from each Company.
-
Group - A truncated list of the processes running.
Here is another example of how to use the "Group-Object" cmdlet. You want
to discover which Event IDs are present in the system log:
Get-EventLog System | Group-Object eventid<enter>
Note: The Name column is the Event ID, even though it's not labeled as
such. By default, "Group-Object" places the property you specify in the
"Name" column.
Sort-Object
From the example above we are presented with a "Count" column. This
indicates the number of occurrences per each Event ID. Just as it sounds,
the "Sort-Object" cmdlet provides a mechanism to sort results. In this
example, I'm going to further build on the command above to sort from most
occurrences to least:
Get-EventLog System | Group-Object eventid | Sort-Object Count
-descending<enter>
The results are now sorted from most to least number of occurrences. Couple
of things to notice here:
· I sorted on the "Count" column. You could also sort by "Name" or any
column you choose.
· As shown above you can pipe results from one cmdlet to another and then
another, etc...
Convertto-HTML
I love this cmdlet. It's not the best html conversion, sometimes the output
looks great, sometimes not. It's just fast and I don't have to write any
code to convert results, like I did in VBScript. Let's send the results of
"Get-Process" to html.
Get-Process | ConvertTo-html<enter>
Well, the cmdlet preformed the conversion but I want the result saved to an
html file. I'm going to use the "Out-File" cmdlet to redirect the results
into a file. This is similar to using the redirect symbol ">" in the old
dos command shell.
Get-Process | ConvertTo-html | out-file "Processes.html"<enter>
To open the .html file use the "Invoke-Item" cmdlet. This is equivalent to
clicking on a file where the file type determines which application is
launched.
Invoke-Item Processes.html<enter>
The default browser is launched presenting the results saved in the html
file. Like I said, doesn't always look great... But it is fast and the html
code can be edited (to look pretty) if desired.
Export-CSV
This is another formatting cmdlet that you are going to love. It takes
results and converts it to a csv file. In the following examples we are
going to Export the processes and open the file in a spreadsheet. You must
have Excel or some other type of spreadsheet installed on the system.
1. Export results to a .csv file"
Get-Process | Export-CSV Processes.csv<enter>
2. Open the spreadsheet:
Invoke-Item Processes.csv<enter>
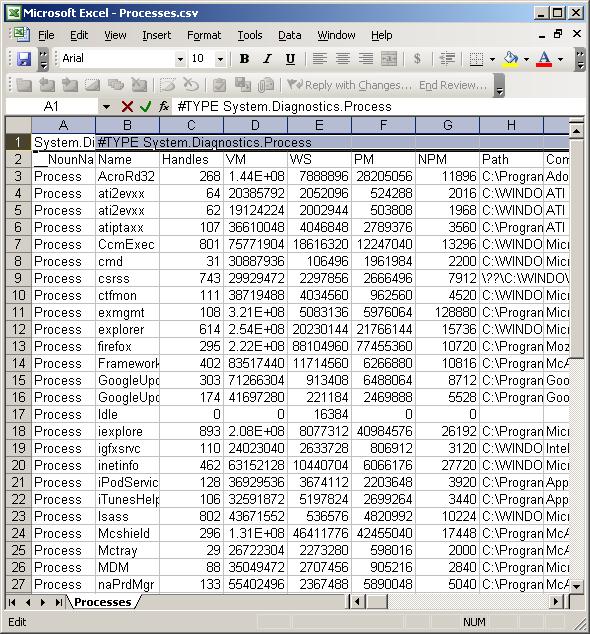
Process CSV
Image 4.2
As shown, you can use the "Export-CSV" cmdlet to quickly document and/or
create reports. Much more simple that what was required to create the same
report in VBScript.
Alright, we got through PowerShell Parameters, Objects, and Formatting. We
just hit the tip of the iceberg, we will continue utilizing these cmdlet
options as we work in later PowerShell tutorials. Obviously, there are more
cmdlet options and parameters we have not covered. PowerShell provides the
tools (Get-Help and Get-Member) to explore and learn, so snoop around and
get your feet wet.
Hope I was able to shed some light on the advantage objects provide over
traditional shell "text string" output. As Objects are the heart of
PowerShell and PowerShell scripting, we will be working in depth with
objects as we continue our PowerShell training. If you have any comments or
questions please use the comment section bellow.