Powershell Functions
A function is a block of code that will be executed when "someone" calls it:
Function Syntax
A function is written as a code block (inside curly { } braces), preceded by the function keyword:
Calling a Function with Arguments
When you call a function, you can pass along some values to it, these values are called arguments or parameters.
These arguments can be used inside the function.
You can send as many arguments as you like, in specified order, if want to change the order of arguments or parameters passed then have to specify the argument name with "-".
myFunc
{
Param ([int] $var1, [int] $var)
.. play with the variable function parameters.
}
The variables and the arguments must not be in the expected order. You can specify the argument name with "-".
Please see the example below,
Functions With a Return Value
Sometimes you want your function to return a value back to where the call was made.
This is possible by using the return statement.
When using the return statement, the function will stop executing, and return the specified value.
Example 1: Addtion of two numbers
Example
function add
{
Param ([int] $a, [int] $b)

return $a + $b
}

add -a 5 -b 4
Copy and Try it
Output : 9
Powershell intelligent enough to identify the parameters in order or you specify the parameters or combination of these.
In below example one of the argument is specified and another one is not still powershell identifies then parameters.
Example 2 :
Example
function add
{
Param ([int] $a, [int] $b)

return $a - $b
}

add -b 5 4
Copy and Try it
Output: -1
Example 3: With validation
Example
Function Create-MyFoldler
{
	Param([string]$rootPath= $(throw"$rootPath required."), [string]$subFolder)

	if ([System.String]::IsNullOrEmpty($subFolder))
	{
		$folderToCreate=$rootPath
        write-host "Output 1:-" + $folderToCreate
	}
	else
	{
		$folderToCreate=Join-Path$rootPath$subFolder
        write-host "Output 2:-" + $folderToCreate
	}

    if (![IO.Directory]::Exists($folderToCreate))
	{
		New-Item $folderToCreate -ItemType directory
        write-host "Output 3:-" + $folderToCreate
	}
}


Create-MyFoldler -rootPath "c:\test"
Copy and Try it
PowerShell Functions and Filters - The basics
-
Function
- A function allows you to name a block of code. The code block can
then be called (by its name) once or multiple times anywhere from
within your script.
-
Filter
- A Filter (as it sounds) takes large amounts of pipeline data and
displays only the results of interest to you.
PowerShell Functions
The main reason I use functions is script organization. It allows me the
ability to call script blocks multiple times within a script, cutting down
on the amount of code writing to accomplish my task. Not to mention it
improves readability and makes complex PowerShell scripts manageable. This
PowerShell training session introduces the concepts of a Function and a
Filter. It is intended as an introduction, advance techniques will be
covered in the PowerShell advanced tutorials launched early next year. With
that being said, this tutorial will teach the concept of functions used for
modular scripting and how to build libraries of reusable code. We will also
briefly talk about filters.
Function Syntax:
Function(keyword) FunctionName (parameters) {script block}
The syntax uses the keyword Function, a FunctionName you provide, optional parameters, and the script
block.
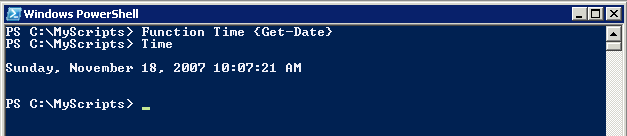
Example 1. Create a Function called "Time" which runs the Get-Date cmdlet
when called.
Function Time {Get-Date}<enter>
Call the function by typing the FunctionName Time at the command prompt.
PowerShell Function
image 10.1
Simple stuff right! We defined a function using the "Function" keyword,
named the function "Time," omitted the optional parameters, and assigned
the Get-Date cmdlet within the script block. Now let's start adding some
parameters.
Passing Arguments to Functions
There are multiple ways to pass arguments to a function. I'll introduce
some common methods.
Method 1:
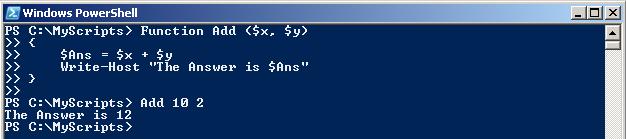
Passing Arguments in a comma separated list. Notice that the parameters
enclosed in parenthesis and separated by a comma, much like an array.
Function Add ($x, $y)
{
$Ans = $x + $y
Write-Host "The Answer is $Ans"
}
Result
Copy the code into PowerShell and hit enter twice to get back to the
command prompt. Now, at the command prompt type the function and arguments
for $x and $y variables:
Add 10 2
<enter>
You should see the following result - The Answer is 12
image 10.2
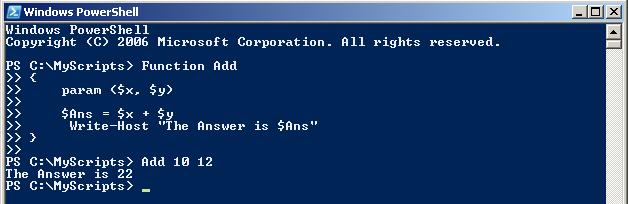
Method 2:
Using the Param keyword. When using the Param keyword, notice that we are defining the arguments
within the scriptblock {}. The Param keyword must be the
first word inside the script block.
Function Add
{
param ($x, $y)
$Ans = $x + $y
Write-Host "The Answer is $Ans"
}
Type - Add 10 12<enter>
Addition
image 10.3
Method 3:
If you recall from PowerShell Tutorial 7: Variables, Arrays, and Hash Tables - There
is a special variable $Args which contains an array of the
parameters passed to a function. Let's use this variable to show how we can
pass an argument using string expantion.
Function HAL {"What are you doing $args ?"}<enter>
Type in the FunctionName and an Argument:
HAL Dave

$Args
image 10.4
You can use multiple $Args variables to pass more than one
parameter.
Example 2.
Function Add { $args[0] + $args[1] }<enter>
Type: Add 5 8

Multiple $Args
image 10.5
Defining Data Types
Remember the "Data Type" table that was introduced in PowerShell training
session 7?
|
Type
|
Description
|
|
[int]
|
32-bit signed integer
|
|
[long]
|
64-bit signed integer
|
|
[string]
|
Fixed-length string of Unicode characters
|
|
[char]
|
A Unicode 16-bit character
|
|
[byte]
|
An 8-bit unsigned character
|
|
[bool]
|
Boolean True/False value
|
|
[decimal]
|
An 128-bit decimal value
|
|
[single]
|
Single-precision 32-bit floating point number
|
|
[double]
|
Double-precision 64-bit floating point number
|
|
[xml]
|
Xml object
|
|
[array]
|
An array of values
|
|
[hashtable]
|
Hashtable object
|
PowerShell does a good job of automatically setting data types for us.
Although, there may be instances were it is required to define (or hard
code) the expected data type for a variable. Best practices would recommend
that you always define the Data Type for a variable as it prevents parsing
errors. For example, you have written a script that asks the users age. The
expected result is an integer, otherwise the script would fail.
Let's test this:
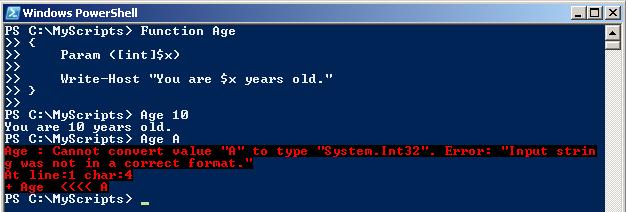
Function Age
{
Param ([int]$x)
Write-Host "You are $x years old."
}
Data Type Error
image 10.6
Notice to two commands I ran in image 10.6.
-
Age 10
- The argument 10 is an integer and is accepted by PowerShell resulting
in the output You are 10 years old.
-
Age A
- The argument A is not an integer and cannot be automatically
converted as we defined the variable requirement as an integer
([int]$x). Therefore PowerShell gives us the error in image 10.6.
Assigning a Default Value
We can also assign a default value should an argument not get passed to the
function.
Function Add
{
Param ([int]$x = 0, [int]$y = 0)
$Ans = $x + $y
Write-Host $Ans
}
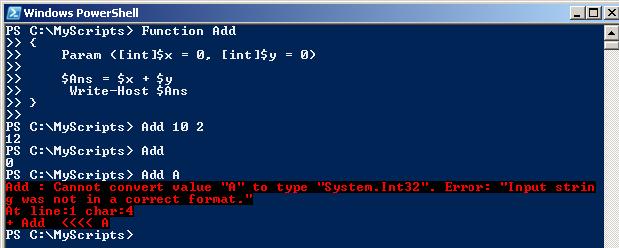
Data Type Error
image 10.7
So I created the Add function with the default variable of $x=0 and $y=0.
What happens when I run the following commands:
-
Add 10 2
- Variable $x becomes 10 and $y becomes 2. The result is 12.
-
Add
- Since we did not send any arguments, the default was used for $x and
$y resulting in 0 + 0 = 0.
-
Add A
- Again, we attempted to send an alpha character when the expected
entry for the variable is an integer resulting in a conversion error. I
wanted to make a point that sending the wrong data type does not result
in the variable being assigned the default of 0.
Using the PowerShell Special Variable "$input"
The $input variable allows a function to access data
coming from the pipeline. For example let's say were looking for the folder
"Windows" and we don't know where it is located.
First build the function to find the Windows Folder:
Function FindFolder
{
$input | Where-Object {$_.Name -eq "Windows"}
}
Next Type the following command which pipes the cmdlet output to the
function we defined:
Get-ChildItem -Path C:\ | FindFolder<enter>
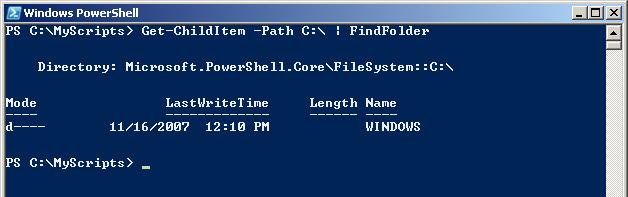
$input Results
image 10.8
So, what are we doing here? We created a function call FindFolder which uses the "Where-Object" cmdlet to filter
results based on the Name property. But what results is it filtering? By
itself it is just a function that does nothing until we send piped results
to the $input variable.
In this example we run the Get-ChildItem cmdlet telling it to start at the
root of C:\ drive. Simple enough, if we ran this command by itself we would
get all the files and directories just under the root of
C: drive. By piping the information to our function, the information is
stored in the $input variable and only the folder named "Windows" is allow
to pass.
Let me show you how we can use a function to find a needle in the haystack.
In this example we will use a filter to find the Hosts file on a system.
Create the Function:
Function FindHosts
{
$input | Where-Object {$_.Name -eq "hosts"}
}
Next, since were not sure if the directory containing the hosts file is a
directory under of the root of C: drive, we use the -recurseparameter to search all directories and
subdirectories under the root.
Use the following command:
Get-ChildItem -Path C:\ -Recurse | FindHosts<enter>
Eventually we find the hosts file and the location
Directory:
Microsoft.PowerShell.Core\FileSystem::C:\Windows\system32\drivers\etc
I know that there are other ways to filter this information in PowerShell.
The examples provided were to show how this task can be accomplished using
functions. Next let's talk about filters.
PowerShell Filters
A Filter and a Function are essentially the same. The difference is how
they process data.
Filter Syntax:
Filter(Keyword) FilterName (parameters) {Script Block}
The syntax is the same as defining a Function except the "Filter" keyword
is used, not the "Function" keyword. A function uses the $input variable to contain pipeline information whereas
the filter uses a special variable $_ that contains the
current pipeline object. Here is where the Function and Filter differ; The
function doesn't run until all data has been stored in the $input variable, whereas the filter has immediate access
to the $_ variable and begins processing elements as they
become available (streaming).
Due to the $_ variable being able to process objects
immediately, filters are widely used and more efficient when large amounts
of data are passed through the object pipeline.
For now, just take in the concepts. We will be working more with filters as
we progress.
Real World Examples
Organizing Your Code
There are two methods I use to organize code:
1. Modular Scripting
2. Dot Sourcing
I find both methods useful but, most of the feedback I have gotten points
to Dot Sourcing as being the most commonly used method. I'm going to show
you both as I believe both methods have there own unique value.
Modular Scripting Example
I'm going to take two PowerShell script examples from the "Microsoft Script
Center" and show you how to create user-defined functions and call them
from a script.
Say you want to inventory your system, gathering information about the
Processor(s) and Disk(s) available on the system. From the "Microsoft
Scripting Center" you find these two scripts.
List Processor Information:
$strComputer = "."
$colItems = get-wmiobject -class "Win32_Processor" -namespace "root\CIMV2″
`
-computername $strComputer
foreach ($objItem in $colItems) {
write-host "Caption: " $objItem.Caption
write-host "CPU Status: " $objItem.CpuStatus
write-host "Current Clock Speed: " $objItem.CurrentClockSpeed
write-host "Device ID: " $objItem.DeviceID
write-host "L2 Cache Size: " $objItem.L2CacheSize
write-host "L2 Cache Speed: " $objItem.L2CacheSpeed
write-host "Name: " $objItem.Name
write-host
}
List Physical Disk Properties:
$strComputer = "."
$colItems = get-wmiobject -class "Win32_DiskDrive" -namespace "root\CIMV2″
`
-computername $strComputer
foreach ($objItem in $colItems) {
write-host "Description: " $objItem.Description
write-host "Device ID: " $objItem.DeviceID
write-host "Interface Type: " $objItem.InterfaceType
write-host "Media Type: " $objItem.MediaType
write-host "Model: " $objItem.Model
write-host "Partitions: " $objItem.Partitions
write-host "Size: " $objItem.Size
write-host "Status: " $objItem.Status
write-host
}
List Processor Information and List Disk Functions
In this example we are converting the ListProcessor and the ListDisk
scripts, provided by Microsoft, into functions. Here are the syntaxes I've
used: Function ListProcessor {Script Block} -and- Function ListDisk {Script
Block}
Note:
In PowerShell scripting, the "#" symbol is used for comments.
ListProcessor Function
# FileName: ListProcessor.txt
#
=============================================================================
# FUNCTION LISTINGS
#
=============================================================================
# Function: ListProcessor
# Created: [09/17/yyyy]
# Author: Admin
# Arguments:
#
=============================================================================
# Purpose: Provides Processor information
#
#
#
=============================================================================
function ListProcessor {
$colItems = get-wmiobject -class "Win32_Processor" -namespace "root\CIMV2″
`
-computername $strComputer
foreach ($objItem in $colItems) {
write-host "Caption: " $objItem.Caption
write-host "CPU Status: " $objItem.CpuStatus
write-host "Current Clock Speed: " $objItem.CurrentClockSpeed
write-host "Device ID: " $objItem.DeviceID
write-host "L2 Cache Size: " $objItem.L2CacheSize
write-host "L2 Cache Speed: " $objItem.L2CacheSpeed
write-host "Name: " $objItem.Name
write-host
}
}
ListDisk Function
#* FileName: ListDisk.txt
#*=============================================================================
#* FUNCTION LISTINGS
#*=============================================================================
#* Function: ListDisk
#* Created: [09/15/2017]
#* Author: Admin
#* Arguments:
#*=============================================================================
#* Purpose: Provides Disk Information
#*
#*
#*=============================================================================
Function ListDisk {
$colItems = get-wmiobject -class "Win32_DiskDrive" -namespace "root\CIMV2″
`
-computername $strComputer
foreach ($objItem in $colItems) {
write-host "Description: " $objItem.Description
write-host "Device ID: " $objItem.DeviceID
write-host "Interface Type: " $objItem.InterfaceType
write-host "Media Type: " $objItem.MediaType
write-host "Model: " $objItem.Model
write-host "Partitions: " $objItem.Partitions
write-host "Size: " $objItem.Size
write-host "Status: " $objItem.Status
write-host
}
}
To verify functionality, you can copy and paste the functions into
PowerShell and call them from the command line by name. They will enumerate
the data on the local host.
Building a Modular PowerShell Script
I'm going to write a script that enumerates the processor(s) and disk(s)
properties. I'll "snap-in" my newly created functions and use the "SCRIPT
BODY" section of the template to control the function calls. This may sound
familiar to you if you have worked with VBScript; subroutines and
functions. Couple of differences:
1. Functions in PowerShell provide the same functionality that both
subroutines and functions did in VBScript. So, subroutines do not exist in
PowerShell.
2. PowerShell parses scripts sequentially - meaning functions need to be
declared before they can be called in the script. This is unlike VBScript,
were the whole script is read by the scripting host before it is executed.
Here is what a modular script would look like:
#* FileName: ComputerInv.ps1
#*=============================================================================
#* Script Name: [Computer Inventory]
#* Created: [09/15/2017]
#* Author: Admin
#* Company: PowerShell Pro!
#* Email:
#* Web: http://www.powershellpro.com
#* Reqrmnts:
#* Keywords:
#*=============================================================================
#* Purpose: Computer Invetory of CPU and Disk Properties
#*
#*
#*=============================================================================
#*=============================================================================
#* REVISION HISTORY
#*=============================================================================
#* Date: [DATE_MDY]
#* Time: [TIME]
#* Issue:
#* Solution:
#*
#*=============================================================================
#*=============================================================================
#* FUNCTION LISTINGS
#*=============================================================================
# Function: ListProcessor
# Created: [09/17/yyyy]
# Author: Auther
# Arguments:
#
=============================================================================
# Purpose: Provides Processor information
#
#
#
=============================================================================
function ListProcessor {
$colItems = get-wmiobject -class "Win32_Processor" -namespace "root\CIMV2″
`
-computername $strComputer
foreach ($objItem in $colItems) {
write-host "Caption: " $objItem.Caption
write-host "CPU Status: " $objItem.CpuStatus
write-host "Current Clock Speed: " $objItem.CurrentClockSpeed
write-host "Device ID: " $objItem.DeviceID
write-host "L2 Cache Size: " $objItem.L2CacheSize
write-host "L2 Cache Speed: " $objItem.L2CacheSpeed
write-host "Name: " $objItem.Name
write-host
}
}
#*=============================================================================
#* Function: ListDisk
#* Created: [09/15/yyyy]
#* Author: Auther
#* Arguments:
#*=============================================================================
#* Purpose: Provides Disk Information
#*
#*
#*=============================================================================
Function ListDisk {
$colItems = get-wmiobject -class "Win32_DiskDrive" -namespace "root\CIMV2″
`
-computername $strComputer
foreach ($objItem in $colItems) {
write-host "Description: " $objItem.Description
write-host "Device ID: " $objItem.DeviceID
write-host "Interface Type: " $objItem.InterfaceType
write-host "Media Type: " $objItem.MediaType
write-host "Model: " $objItem.Model
write-host "Partitions: " $objItem.Partitions
write-host "Size: " $objItem.Size
write-host "Status: " $objItem.Status
write-host
}
}
#*=============================================================================
#* SCRIPT BODY
#*=============================================================================
# Create a string variable using the local computer.
$strComputer = "."
# Call the "ListProcessor" function.
ListProcessor
# Call the "ListDisk" function.
ListDisk
#*=============================================================================
#* END OF SCRIPT: [Computer Inventory]
#*=============================================================================
Now you have a visual of a modular PowerShell script. I declared the
functions and used the "SCRIPT BODY" to snap the functions in place. Let's
say you want to change to order of the script, you want to list the Disk
Properties before the Processor Properties. You only need to reverse the
order of the function calls in the "SCRIPT BODY" to make this happen.
Modular scripting is a great way to organize your scripts. It allows you to
build from a user-defined functions library, that you maintain. You can
"snap-in" new functionality to existing scripts as needed and easily
control the flow of your script without having to move around large chunks
of code. Modular scripting may not be the best solution for the example
above, the example was provided only to introduce the concept. Again, as
your tasks become more complex so do your scripts. With modular scripting,
complex scripts become more manageable.
Dot Source (Calling Scripts and Functions)
Essentially, "dot-source" means using dot-notation to call script blocks,
functions, and/or aliases from within your script. We're going to use the
same script examples above, but instead of calling the function written
within the script, we will use dot-notation to call scripts that exists
outside the main script. The syntax used for dot-notation and script-blocks
is:
.{}
Example 1. Calling a Script from within a Script
In the first example, I'm going to be working from the "C:\MyScripts"
directory.
Step 1.
Save the following code as CPU.ps1 in the MyScripts directory:
$colItems = get-wmiobject -class "Win32_Processor" -namespace "root\CIMV2″
`
-computername $strComputer
foreach ($objItem in $colItems) {
write-host "Caption: " $objItem.Caption
write-host "CPU Status: " $objItem.CpuStatus
write-host "Current Clock Speed: " $objItem.CurrentClockSpeed
write-host "Device ID: " $objItem.DeviceID
write-host "L2 Cache Size: " $objItem.L2CacheSize
write-host "L2 Cache Speed: " $objItem.L2CacheSpeed
write-host "Name: " $objItem.Name
write-host
}
Step 2.
Save this code as Disk.ps1:
$colItems = get-wmiobject -class "Win32_DiskDrive" -namespace "root\CIMV2″
`
-computername $strComputer
foreach ($objItem in $colItems) {
write-host "Description: " $objItem.Description
write-host "Device ID: " $objItem.DeviceID
write-host "Interface Type: " $objItem.InterfaceType
write-host "Media Type: " $objItem.MediaType
write-host "Model: " $objItem.Model
write-host "Partitions: " $objItem.Partitions
write-host "Size: " $objItem.Size
write-host "Status: " $objItem.Status
write-host
}
Steps 1 and 2 are the same script blocks that we've worked with in this
PowerShell Article. Now, let's modify our main script body to use
dot-notation to call these scripts.
Step3:
Modify the main script as follows: Remove the function(s) code from the
script and modify the script body to call both CPU.ps1 and Disk.ps1
scripts.
#* FileName: ComputerInv_v1.1.ps1
#*=============================================================================
#* Script Name: [Computer Inventory]
#* Created: [09/15/yyyy]
#* Author: Auther
#* Company: PowerShell Pro!
#* Email:
#* Web: http://www.powershellpro.com
#* Reqrmnts:
#* Keywords:
#*=============================================================================
#* Purpose: Computer Invetory of CPU and Disk Properties
#*
#*
#*=============================================================================
#*=============================================================================
#* REVISION HISTORY
#*=============================================================================
#* Date: [10/09/yyyy]
#* Time: [9:30 AM]
#* Issue: Dot-Source Example
#* Solution:
#*
#*=============================================================================
#*=============================================================================
#* SCRIPT BODY
#*=============================================================================
# Create a string variable using the local computer.
$strComputer = "."
# Use Dot-Source to Call the "ListProcessor" function.
.{.\CPU.ps1}
# Use Dot-Source to Call the "ListDisk" function.
.{.\Disk.ps1}
#*=============================================================================
#* END OF SCRIPT: [Computer Inventory]
#*=============================================================================
Since I'm working from "C:\MyScripts" directory I can use ".\CPU.ps1″ to
call the scripts in my code. Run the script:
C:MyScripts\ComputerInv_v1.1.ps1<enter>
This works great if we organize all of our scripts (code library) within
the "MyScripts" directory. We can use the System Path to find the .ps1
files. The $PsHome variable provides the installation path
of PowerShell. By saving our scripts (code library) to this directory, we
only have to call the script name without possible path issues. By default,
PowerShell is installed using the following directory path: C:\WINDOWS\system32\WindowsPowerShell\v1.0
Example 2.
Step 1.
Let's move ComputerInv_v1.1.ps1, CPU.ps1, and Disk.ps1 to the v1.0
directory. Then modify the script body as follows:
#* FileName: ComputerInv_v1.1.ps1
#*=============================================================================
#* Script Name: [Computer Inventory]
#* Created: [09/15/yyyy]
#* Author: Auther
#* Company: PowerShell Pro!
#* Email:
#* Web: http://www.powershellpro.com
#* Reqrmnts:
#* Keywords:
#*=============================================================================
#* Purpose: Computer Invetory of CPU and Disk Properties
#*
#*
#*=============================================================================
#*=============================================================================
#* REVISION HISTORY
#*=============================================================================
#* Date: [10/09/yyyy]
#* Time: [9:30 AM]
#* Issue: Dot-Source Example
#* Solution:
#*
#*=============================================================================
#*=============================================================================
#* SCRIPT BODY
#*=============================================================================
# Create a string variable using the local computer.
$strComputer = "."
# Use Dot-Source to Call the "ListProcessor" function.
.{CPU.ps1}
# Use Dot-Source to Call the "ListDisk" function.
.{Disk.ps1}
#*=============================================================================#*
END OF SCRIPT: [Computer Inventory]
#*=============================================================================
Here is the change in the script body - from .{.\scriptname.ps1} to .{scriptname.ps1}
Step 2.
With the script files being placed in the PowerShell install directory, we
only have to type in the script name in which to run. The system path will
find the where the scripts are located and launch them. Let's launch the
Computer Inventory script:
C:\MyScripts\ComputerInv_v1.1.ps1<enter>
Now, CD to the root of C: drive and attempt to run the script again:
C:\ComputerInv_v1.1.ps1<enter>
Did the script work? It will use the System's path to find the .ps1 files
if necessary
Example 2. Calling a Function from another script file.
Using "dot-sourcing" you could create a library of functions. For example,
let's say you have one large file that contains over 100 separate functions
you've created. Essentially, you maintain your function library in one or
two documents. You can use dot sourcing to read the file and call one or
more functions written in the file.
Click here to find out how...
Which process should I use (Modular or Dot Source)?
Do I write functions within the script or do I call other scripts outside
the main script? There is really no wrong or right here, it depends on the
situation. For example, let's say you are writing a script for a client
that will be utilizing functions in your script library. You may wish to
use the modular approach so that you can present your client will a single
script that is well document. If your writing scripts for you own
environment, chances are your using dot sourcing to call other functions as
it takes less time and less code to accomplish the task...
Conclusion
In this PowerShell Training session we have:
-
Defined Functions and Filters.
-
Learned how to create and call Functions.
-
Passed arguments to Functions.
-
Introduced the param keyword and the $args variable.
-
Talked about how to define data types.
-
Explained how to set default parameters.
-
Touched on the differences between Functions and Filters.
-
The $input variable and the $_
variable.
· Examples of using Functions to organize scripts and control script
execution.
Again, the purpose of this tutorial was the introduction of Functions and
Filters and how they can assists with script organization. Functions and
Filters provide many uses as we will discover as we progress. These uses
will become known throughout the rest of the tutorials.