PowerShell Array Hashes Variable
What is array?
An array is a number of items arranged in some specified way.
Like in other languages we can define variable as array and assign or add items or values in it.
In PowerShell defining array is very simple and flexible. You just have items separated by the by the comma.
We will see some examples of array also we will how to calculate length of the array.
We will see some examples to find array contain and indexing syntax.
How to the array and last but not least example of type cast the array element into data type to maintain the type safety
All arrays in PowerShell are 0 based, that means PowerShell array start with zero. (It is similar for most of the languages)
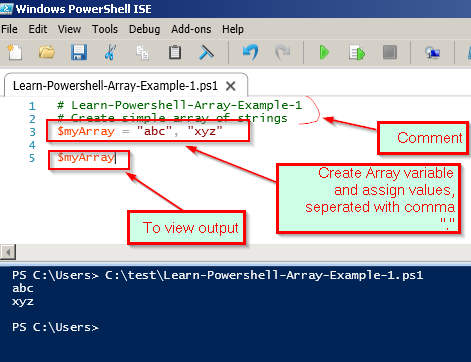
Example 1: Declare array simple array
Example
# Learn-Powershell-Array-Example-1
# Create simple array of strings
$myArray = "abc", "xyz"
$myArray
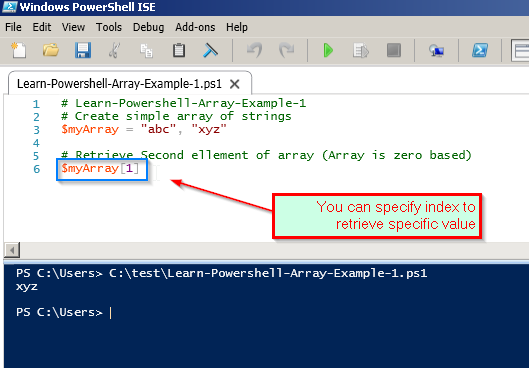
Example 2: Retrieve specific array element
All arrays in PowerShell are 0 based, To Retrieve any element or item you have to give index -1 in square brackets
e.g. $myArray[1]
Example
# Learn-Powershell-Array-Example-1
# Create simple array of strings
$myArray = "abc", "xyz"
# Retrieve Second ellement of array (Array is zero based)
$myArray[1]
Example 3: Retrieve all array elements # Learn-Powershell-Array-Example-1 # Create simple array of strings $myArray = "abc", "xyz", "pqr" $myArray
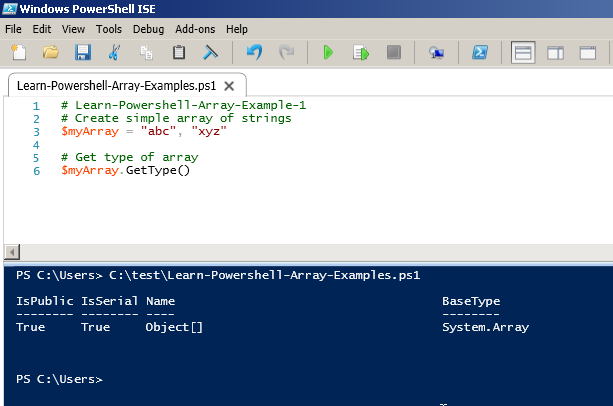
Example 4: Get data type of array
$myArray.GetType()
Example
# Learn-Powershell-Array-Example-1
# Create simple array of strings
$myArray = "abc", "xyz"
# Get type of array
$myArray.GetType()
Example 5: Update Specific Element of Array
To update any specific element of array just specify the array variable with index in square bracket and assign value with equal operator.
Example
# learn-powershell-array-examples
# create simple array of strings
$myarray="abc" , "xyz" , "pqr" , "dcb"
# before
$myarray
# update of array
$myarray[2]="new"
# after
write-host "############### After##########"
$myarray

Example 6: Updating Whole Array
To update whole array of elements
Example
# Learn-Powershell-Array-Examples
# Create simple array of strings
$myArray = "abc", "xyz", "pqr", "dcb"
# Before
$myArray
# update of array
$myArray[2] = "new", "value"
# After
Write-Host "############### After##########"
$myArray

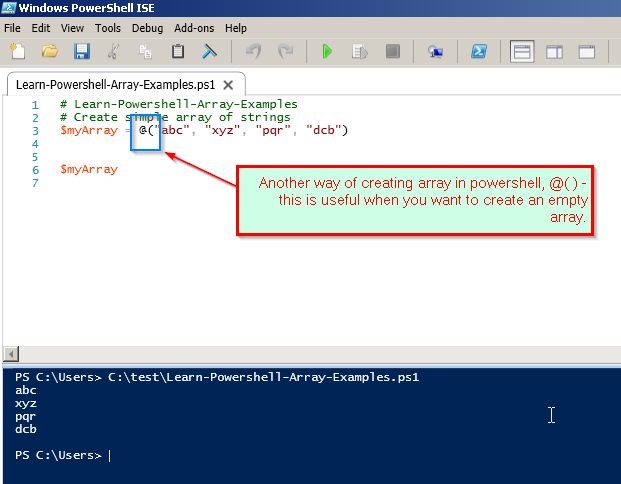
Example 7: Another way of creating Array
Example
# Learn-Powershell-Array-Examples
# Create simple array of strings
$myArray = @("abc", "xyz", "pqr", "dcb")

$myArray
Example 8: Create empty array in PowerShell, using this way we can create empty array
Example
    # Learn-Powershell-Array-Examples
    # Create simple array of strings
    $myArray = @()
    $myArray.Length

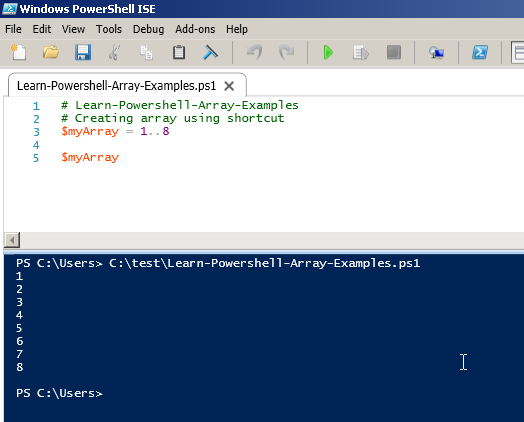
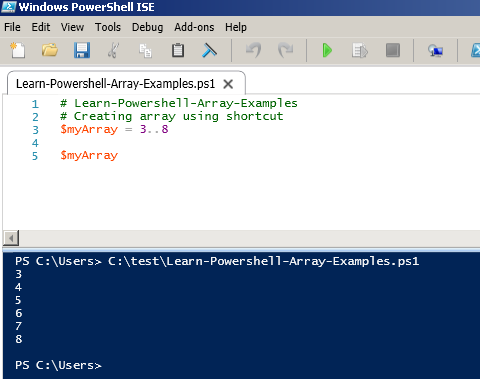
Example 9: Shortcut to create Array (Put the first value followed by two dots/periods and then last value)
You can specify any range here, Although we have create array with 1, but you can start with any number.
Powershell is smart enough to create array if you provide first value greater than second, it create an array of reverse values.
Example
# Learn-Powershell-Array-Examples
# Creating array usinshortcut
$myArray = 1..8
$myArray
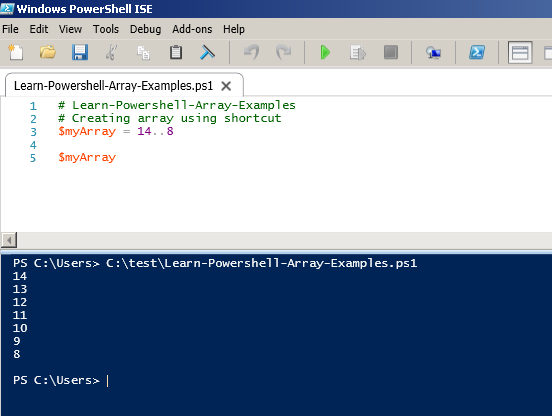
Example 10: Check contains of Array Check if values is present becareful type of array, here it is int array so dont specify value with double quotes
Example
# Learn-Powershell-Array-Examples
# Creating array using shortcut
$myArray = 14..8
$myArray
Write-Host
# check if values is present becareful type of array, here it is int array so dont specify value with double quotes
$myArray.Contains(11)

Example 11: Check notcontains of Array (We should use of of -notcontains as it sometimes confuse users) PS C:\> $myarray = 5, 10, 20, 4 $myarray -notcontains 20
Example 12: Get the length of Array
Example
# Learn-Powershell-Array-Examples
# Create simple array of strings
$myArray = "abc", "xyz", "pqr", "dcb"
# Before
$myArray
Write-Host "Length of array"
$myArray.Length
Example 13: Sort Array elements ascending order
Example 14: Sort Array elements descending order
Example 15: Array Decimal elements
ArrayList
Adding and removing Items from a Power Shell array is a topic which can teach you how it is related to c# System.Array Object Create an power shell array and we will note the type System.Array
However, if we try to Add or Remove items to the array we get errors that the "Collection was of a fixed size" By Default array we originally created is of a fixed size. It only allows you to modify of existing elements, but not the addition or removal of others. One way to manage with this is to use of type System.Collections.ArrayList instead of Array Now try to do following operations. -------Hash Table-------------
PowerShell has another method for holding lists of values called hash tables.
What is Hash Table
A hash table is a data structure used to implement an associative array, a structure that can map keys-values pairs.
From which the correct value can be found using key instead of index we saw in above example.
In short array is numerically based and hash table is key based collection
Example 1: Decalre/Create Hash table
Example 2: Get all the vales of Hash table
Example 3: Get single value from Hash table using key
Example 4: Get single value from Hash table using object type syntax
Example 5: Get single value from Hash table using variables $hash.$myKey
Example 6: Get single value from Hash table using variables another way $hash.$($myKey)
Example 7: Add/Replace or remove values Hash table $hash["aaa"] = "Anything"
Example 8: Remove values Hash table $hash.Remove("aaa")
Example 9: Contains in Hash table $hash.Remove("aaa")
Example 10: Get all keys in Hash table $hash.Keys
Example 10: Get all values in Hash table $hash.Values
-----Variables
Built in variables in PowerShell.
[string] Fixed-length string of Unicode characters
[char] A Unicode 16-bit character
[byte] An 8-bit unsigned character
[bool] Boolean True/False value
[int] 32-bit signed integer
[single] Single-precision 32-bit floating point number
[double] Double-precision 64-bit floating point number
[long] 64-bit signed integer
[DateTime] Date and Time
[decimal] A 128-bit decimal value
[array] An array of values
[hashtable] Hashtable object
[xml] Xml object
Variables, Arrays, and Hash Tables
we are going to discuss storing, retrieving, and manipulating data within PowerShell. PowerShell enables us to store information using the following methods:
- Variables - allows us to store single bits of information.
- Arrays - allows us to store information in an index.
- Hash Table - allows us to store in key-value pairs.
Launch PowerShell and let’s get started…
PowerShell Variables
Think of a variable as an imaginary box where we store information. Two basic uses of variables are:
- Store information that will be later utilized within a script.
- Store information that is a result of running a script.
In PowerShell, variables can contain text strings, integers, and even objects (complete with properties and methods). Special variables exist, which are pre-defined within PowerShell. We have worked with one of these variables ($_) in a prior tutorial.
Special Variable Examples
- $_ – Contains the current pipeline object, used in script blocks, filters, and the where statement.
- $Args – Contains an array of the parameters passed to a function.
- $Error – Contains objects for which an error occurred while being processed in a cmdlet.
- $Home – Specifies the user’s home directory.
- $PsHome – The directory where the Windows PowerShell is installed.
To view the complete list of Special Variables in PowerShell, type the following:
In VBScript, we have to declare variables before using them. For example:
dim strUser
dim intDate
strComputer = “MyComputer”
etc…
In PowerShell, ALL variable names must start with the “$” character. Once data is assigned to a PowerShell variable, it’s automatically declared. The “=” operator is used to assign data to a variable. Here is a simple example of creating a variable in PowerShell:
There is a “Set-Variable” cmdlet that can also be used:
You can use virtually any variable name you choose, names are not case sensitive. Note: there are illegal characters such as; ! @ # % & , . and spaces. PowerShell will throw an error if you use an illegal character.
I stated virtually any name as PowerShell does have a set of keywords that are reserved and cannot be used as variable names:
- break
- continue
- do
- else
- elseif
- filter
- foreach
- function
- if
- in
- return
- switch
- until
- where
- while
When naming variables, I continue to use the caMel case naming convention I became accustomed to in VBScript. The first part of the name (str) reminds me that the variable I’m working with contains “text string” data. If I were working with numbers, it might look like something this “$intMegaBytes.” Again, you can use any naming convention you wish.
Let’s verify that the $strComputer variable is holding the data we assigned to it.
-or just type-

$strComputer Variable
image 7.0
The output verifies the data in the $strComputer variable is the “Computer1″ text string. Go ahead and verify the data value for the “strUser” variable.
Did you get John Doe for the output? Yes… great! No?… I knew you were going to skip the long version of using the “Set-Variable” cmdlet.
Note: If you use the “Set-Variable” cmdlet and specify the -Name parameter, you do not use the “$” character when defining variables. Most of the time I use ($strComputer = “computerName”) to create variables. Just be conscious of this rule when using the “Set-Variable” cmdlet.
Working with Strings
A [sting] is a “text string” data type. There are many data types that we will be working with in PowerShell:
| Type | Description |
|---|---|
| [int] | 32-bit signed integer |
| [long] | 64-bit signed integer |
| [string] | Fixed-length string of Unicode characters |
| [char] | A Unicode 16-bit character |
| [byte] | An 8-bit unsigned character |
| [bool] | Boolean True/False value |
| [decimal] | An 128-bit decimal value |
| [single] | Single-precision 32-bit floating point number |
| [double] | Double-precision 64-bit floating point number |
| [xml] | Xml object |
| [array] | An array of values |
| [hashtable] | Hashtable object |
Yep, we will be discussing them all at some point…
String Concatenation
Concatenation is the process of joining together two strings. Here is an example:
$strB = “World!”<enter>
$strC = $strA += $strB<enter>
$strC<enter>
We used += to join together variables $strA and $strB and store the new “text string” in variable $strC. The output from $strC is Hello World!
Most of the time you will see two strings joined together by using just the “+” operator. Like so; $strC = $strA + $StrB. Both result in the same output.
Aside from joining strings we can also replace words using the -replace parameter.
$strB = $strA -replace “east”, “west”<enter>
$strB<enter>
Go west young man!
What the heck is Interpolation?
Quotes are used when working with string data, either double-quotes(” “) or single-quotes(‘ ‘). What’s the difference? Glad you asked… It’s called Interpolation. As stated at the beginning of this PowerShell training session, variables are stored for later use. Interpolation occurs when a string variable is enclosed in double-quotes and does not occur when single-quoted. Let me give you an example of what this means:
Write-Host “Tom drives a $strA car.”<enter>
By double-quoting, the output of the “Write-Host” cmdlet is – Tom drives a fast car. This is interpolation, PowerShell substitutes the value of variable $strA. Let’s see what happens when using single-quotes:
Write-Host ‘Tom drives a $strA car.’<enter>
Output – Tom drives a $strA car.
PowerShell does not substitute the variable.
Working with Numbers
PowerShell works with a number of data types, for example integers(9) and decimals (9.9). The PowerShell engine can automatically recognize the data type assigned to a variable. For example, it knows that $x = 1 is an integer data type. It also knows that $x = “Hello World!” is a string data type.
Assigning integer and decimal values are simple:
$y = 1.2<enter>
$x<enter>
$y<enter>
There are those rare occasions when PowerShell may have not assigned the proper data type to a variable, causing havoc with your script. Though it is not required, it is considered good form to assign the data type of a variable. Refer to the data type table presented earlier in the tutorial. Here are some examples:
[int]$x = 9<enter>
[decimal]$y = 9.9<enter>
PowerShell Operators
- = Assigns a value to a variable.
- + or += Addition.
- - or -= Subtraction.
- * or *= Multiplication.
- / or /= Division.
- % or %= Modulus (retrieves the remainder of a division operation).
PowerShell follows the rules of math. Equations are read from left-to-right, multiplication and division are preformed then addition and subtraction.
$x<enter>
What answer did you get? Hopefully 33.
What about:
$x<enter>
Parenthesis can be used to alter the order of the mathematical rule. O.k. enough math class.
Note: PowerShell has two additional operators that you will use frequently. Make a mental note of these operators as you will be using them often in your script writing.
- “++” Increments a value by 1.
- “–” Decrements a value by 1. -Hard to see, it is minus minus or (- -) without the space.
Examples:
$x<enter>
1
$x++<enter>
$x<enter>
2
$x++<enter>
$x<enter>
3
$x–<enter>
$x<enter>
2
We will work with more data types when the advanced PowerShell tutorials are launched.
Here are nine exercises to complete. See if you can get through them all without looking at the answers. Answers provided below the exercise:
- Create a variable named $strComputer and assign the files server name FSrv01.
- Create a variable named $x and assign the number 7.
- Create a variable named $y, assign the data type and number 11.
- Create a variable named $Pi, assign the data type and number 3.14
- Concatenate the following variables, strA = “This is a ” and strB = “text string.”
- Using two variables, subtract 5 from 9.
- Using two variables, add 5 and 9.
- Assign the number 1 to variable $x and increment by 1.
- Get the answer for the following equation. 5 * 2 / 10 + 7 / 3 * 2.
Answers:
- $strComputer = “FSrv01″
- $x = 7
- [int]$y = 11
- [decimal]$Pi = 3.14
- strA + strB -or- strA += strB
- $x = 9<enter> $y = 5<enter> $x – $y<enter>
- $y + $x<enter>
- $x = 1<enter> $x++<enter> $x<enter>
- $x = 5 * 2 / 10 + 7 / 3 * 2<enter> $x = 6
PowerShell Arrays
Variables can also store arrays which by definition are an indexed list of values. Each item is assigned a unique index number. The first item in an array is assigned the value of (0), the next item (1), then (2), and so on. One of the more popular uses of an array is to run a script against remote computers. If you’ve looked at the PowerShell scripts in the Microsoft Script Center Repository, notice that a lot of scripts only run on the local computer by using strComputer = “.” variable. “.” means the local computer the script is running on. You could run the script on a remote computer by modifying the code like this strComputer = “RemoteComputerName”. But, what if you want to run the script against multiple computers on your network? Ok… besides using a logon script! In essence a logon script still runs locally and you have limited control over when it runs. The answer is by using an array!
To create an array, we create a variable and assign the array. Arrays are noted by the “@” symbol. Let’s take the discussion above and use an array to connect to multiple remote computers:
We now have three values stored in the $strComputers variable. Note: Since I am working with string values, I’m quoting. Also each array value is separated by a comma.
How to list the values in the array:
List the number of items within the array using the count property.
Now that we know there are three elements within the array, we can list an item by it’s index number. Remember, array index numbers start at 0. List values by their index number:
$strComputers[1]<enter>
$strComputers[2]<enter>
We can also modify elements in an array. Here I’m modifying an element in an existing array by providing the index number and the new string value. This changes the item Server3 to Server4.
Verify the element was modified:
Using the + operator, we can combine arrays:
$y = @(6, 7, 8, 9, 10)<enter>
$z = $x + $y<enter>
$z<enter>
Back to our discussion on using arrays to get information from multiple computers. Here is a typical script taken from the Microsoft Script Repository that enumerates the BIOS information on the (strComputer = “.”) local computer. Note: you don’t have to copy the following script code into a .ps1 (PowerShell) script file to run. Just copy and paste the code into the PowerShell Console; to paste in PowerShell just do a right mouse click. When the code has been copied into the shell, just hit <enter> twice to get the results. Just another cool thing you can do with PowerShell…
$colItems = get-wmiobject -class Win32_BIOS -namespace root\CIMV2 -comp $strComputer
foreach ($objItem in $colItems) {
write-host “BIOS Characteristics: ” $objItem.BiosCharacteristics
write-host “BIOS Version: ” $objItem.BIOSVersion
write-host “Build Number: ” $objItem.BuildNumber
write-host “Caption: ” $objItem.Caption
write-host “Code Set: ” $objItem.CodeSet
write-host “Current Language: ” $objItem.CurrentLanguage
write-host “Description: ” $objItem.Description
write-host “Identification Code: ” $objItem.IdentificationCode
write-host “Installable Languages: ” $objItem.InstallableLanguages
write-host “Installation Date: ” $objItem.InstallDate
write-host “Language Edition: ” $objItem.LanguageEdition
write-host “List Of Languages: ” $objItem.ListOfLanguages
write-host “Manufacturer: ” $objItem.Manufacturer
write-host “Name: ” $objItem.Name
write-host “Other Target Operating System: ” $objItem.OtherTargetOS
write-host “Primary BIOS: ” $objItem.PrimaryBIOS
write-host “Release Date: ” $objItem.ReleaseDate
write-host “Serial Number: ” $objItem.SerialNumber
write-host “SMBIOS BIOS Version: ” $objItem.SMBIOSBIOSVersion
write-host “SMBIOS Major Version: ” $objItem.SMBIOSMajorVersion
write-host “SMBIOS Minor Version: ” $objItem.SMBIOSMinorVersion
write-host “SMBIOS Present: ” $objItem.SMBIOSPresent
write-host “Software Element ID: ” $objItem.SoftwareElementID
write-host “Software Element State: ” $objItem.SoftwareElementState
write-host “Status: ” $objItem.Status
write-host “Target Operating System: ” $objItem.TargetOperatingSystem
write-host “Version: ” $objItem.Version
write-host
}
Now we want the same information from multiple remote computers. This time you choose which ones. Create an array with two (or more) computers, FYI – you must have local admin rights on each computer to run the script. Use notepad and change the computer names in the array. Copy and paste your new code into PowerShell.
$colItems = get-wmiobject -class Win32_BIOS -namespace root\CIMV2 -comp $strComputer
foreach ($objItem in $colItems) {
write-host “BIOS Characteristics: ” $objItem.BiosCharacteristics
write-host “BIOS Version: ” $objItem.BIOSVersion
write-host “Build Number: ” $objItem.BuildNumber
write-host “Caption: ” $objItem.Caption
write-host “Code Set: ” $objItem.CodeSet
write-host “Current Language: ” $objItem.CurrentLanguage
write-host “Description: ” $objItem.Description
write-host “Identification Code: ” $objItem.IdentificationCode
write-host “Installable Languages: ” $objItem.InstallableLanguages
write-host “Installation Date: ” $objItem.InstallDate
write-host “Language Edition: ” $objItem.LanguageEdition
write-host “List Of Languages: ” $objItem.ListOfLanguages
write-host “Manufacturer: ” $objItem.Manufacturer
write-host “Name: ” $objItem.Name
write-host “Other Target Operating System: ” $objItem.OtherTargetOS
write-host “Primary BIOS: ” $objItem.PrimaryBIOS
write-host “Release Date: ” $objItem.ReleaseDate
write-host “Serial Number: ” $objItem.SerialNumber
write-host “SMBIOS BIOS Version: ” $objItem.SMBIOSBIOSVersion
write-host “SMBIOS Major Version: ” $objItem.SMBIOSMajorVersion
write-host “SMBIOS Minor Version: ” $objItem.SMBIOSMinorVersion
write-host “SMBIOS Present: ” $objItem.SMBIOSPresent
write-host “Software Element ID: ” $objItem.SoftwareElementID
write-host “Software Element State: ” $objItem.SoftwareElementState
write-host “Status: ” $objItem.Status
write-host “Target Operating System: ” $objItem.TargetOperatingSystem
write-host “Version: ” $objItem.Version
write-host
}
For more information on building arrays to enumerate remote computers, here is a very cool article I’ve written: 3 easy steps to get information from remote computers.
Hash Tables
A Hash table is also known as a dictionary. It is an array that allows you to store data in a “key-value” pair association. The “key” and “value” entries can be any data type and length. The elements must be quoted if they contain a space.
Just like an array we designate a hash table with the @ symbol. There are differences, array elements are enclosed in parenthesis () where hash “key-value” pairs are enclosed in curly brackets {}. Hash elements are separated by the semi-colon.
Creating a hash of users associated with their employee number:
Verify the hash table was created:

Hast Table
Image 7.1
Looks like a mini-database. How would we find John Doe’s employee number?
Add a new employee record:
Verify the creation of new “key-value” pair.
Delete an employee record:
Verify record deletion:
To Remove all records in the hash table, we use the clear method:
To recap, variables are items of information that we store for later retrieval. Arrays consist of numerous values that can be stored in a variable. Hash tables are associative arrays that use a “key-value” pairs. Since a hash table is like a dictionary, it is much easier to find values within the array (as there is an association created). Standard arrays are indexed starting from the number 0. This makes it difficult to find values, unless you’re a large brain and can tell me what value was assigned to index 245.