Introduction to Powershell
Windows PowerShell is Microsoft's task automation framework, consisting of a command-line shell and associated scripting language built on top of .NET Framework. PowerShell provides full access to COM and WMI, enabling administrators to perform administrative tasks on both local and remote Windows systems.
PowerShell is Microsoft new Command Line Interface for Windows systems, it provides access to CMD, Cmdlets, .Net Framework API, Powershell Functions, Access to WMI (Windows Management Instrumentation and Access to Windows COM (Component Object Model)
Windows PowerShell includes the following features:
- Cmdlets for performing common system administration tasks, such as managing the registry, services, processes, and event logs, and using Windows Management Instrumentation (WMI).
- A task-based scripting language and support for existing scripts and command-line tools.
- Consistent design. Because cmdlets and system data stores use common syntax and naming conventions, data can be shared easily and the output from one cmdlet can be used as the input to another cmdlet without reformatting or manipulation.
- Simplified, command-based navigation of the operating system, which lets users navigate the registry and other data stores by using the same techniques that they use to navigate the file system.
- Powerful object manipulation capabilities. Objects can be directly manipulated or sent to other tools or databases.
- Extensible interface. Independent software vendors and enterprise developers can build custom tools and utilities to administer their software.
Output is Always a .NET Object Please, Remember that PowerShell output is always a .NET object. That output could be a System.Diagnostics.Process a object or System.IO.FileInfo object or a System.String object. Basically it could be any .NET object whose assembly is loaded into PowerShell including your own .NET objects.
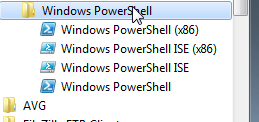
On Windows System prior to Windows 8 and Windows 2012 PowerShell can be found under Start -> All Programs -> Accessories -> System Tools Depending on the architecture of the operating system there will be an x86 version and a x64 version of PowerShell.
Some recommendations when loading PowerShell:
Since PowerShell provides access to many administrative functions it is recommended to run it as Administrator.
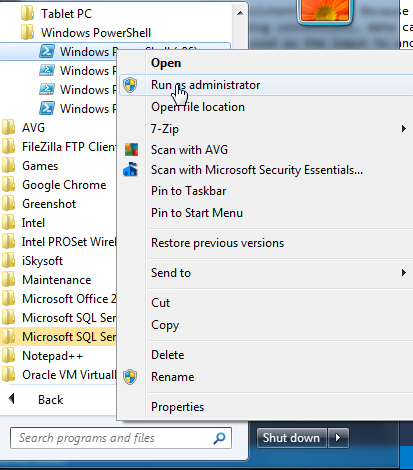
If you are on a x64 system make sure you run the x64 version of it (The one with no x86 in the name of the shortcut)
On PowerShell v4 ISE can also be use as an interactive command prompt where commands are entered in on window and output is shown in the next, in addition it is is a script editor with syntax highlighting

PowerShell is a new command shell from Microsoft and yes it is a command prompt and scripting environment, it can even be both at the same time. But what does PowerShell really mean for a systems administrator? What are the benefits in learning PowerShell? If you manage resources with VBScript you already know the answers. Active Directory domains are becoming larger and more complex. For those administrators that are still chained to GUI tools and the Microsoft Management Console, PowerShell will set you free!!!
It has become a daunting task to manage resources in large domains, GUI just won't DUI anymore. For example, take the recent DST (Daylight Savings Time) change. Microsoft was slow to respond (in my opinion) but did supply hot fixes for XP and Windows 2003. Windows 2000 was a different story, system admins had to rely on a manual edit using tzedit.exe (unless you had a premier contract). Am I bringing back any nightmares? Here was my nightmare; the boss asked, "How do we know that the DST hot fixes and the manual tzedit actually worked?" Gulp! Thank god I was already working on the answer to that question. I found a KB Article posted on the Microsoft web site listing the new DST registry entries and their locations. So with VBScript I enumerated the registry settings, based on operating system version, and created a report. I found a 25% failure rate after applying hot fixes and tzedit. So, I wrote another script that would edit the registry settings with the proper configuration. Thankfully, all of my Server Systems (300+) sprung ahead to the proper DST settings. Ok, so now you are thinking "why are we talking about VBScript? This is a PowerShell tutorial!!!" My point is, I know a lot of IT workers that had to manually update the registry when the clocks didn't roll forward, message boards and forums were full of postings. What would you rather do, logon to each server and manually fix the problem or run a script to fix the issue for you? PowerShell would have been a great tool for this situation; I was just more familiar with VBScript at the time.
I've read and been asked the following, "VBScript is still a viable tool... so why should I learn PowerShell?" I have a couple of simple answers for that:
1. PowerShell was designed for .NET objects; VBScript does not support a method for communicating or interacting with .NET. We will talk more about .NET in later tutorials.
2. Learning PowerShell will further advance your career. Trust me, it will.
This Introduction was not based on what PowerShell is but what PowerShell, as a Shell and a Scripting Language, can do for you. The DST example is only the tip of the iceberg when is comes to the power of scripting languages. What PowerShell "is" you will discover as you continue learning. What's great about PowerShell, you will be able to use it right out of the gate to complete simple tasks. As your knowledge grows you will be able to take on more complex tasks.
PowerShell Concepts
PowerShell is object-based not text-based
This concept will take a little time grasp for dos/cmd.exe and batch script
writers. Those using VBScript and other programming languages already
understand the concept. The basic difference, traditional command prompt
output is text-based while output in PowerShell is not. It looks like text
but it is actually an object. Why is this powerful? Because the output of a
PowerShell command (the object) can be piped into another command without
additional programming. With traditional scripting, if you wanted to use
the output of one command in another, additional programming would be
required to manipulate the data in a format the second command could
understand. What is an object? This should sound familiar to the Windows
Administrators out there... "Everything in an Active Directory Domain is an
object." Servers, Computers, Printers, Shares, Organizational Units,
Security Groups, Group Policy Objects, Users, etc... With PowerShell we can
interact with these objects to enumerate information (object-properties)
and/or create, modify, or delete objects and/or object-properties
(object-methods).
PowerShell Commands are customizable
PowerShell commands are referred to as Cmdlets. With the installation of
PowerShell there are over a hundred cmdlets for you to get up close and
personal with. The PowerShell team, in their infinite wisdom, created
aliases to allow us to use the traditional commands we have become
accustomed to (dir, cd, del, copy, etc...). Even the UNIX guys get a break
with provided aliases (ls, man, etc...). PowerShell allows you to create your
own aliases as well as creating your own cmdlets. Yep, unlike dos/cmd and
reskit exe's, PowerShell provides a method to create your own PowerShell
cmdlets.
PowerShell is a Command line interpreter and a scripting environment
In a nutshell you have the best of both worlds within PowerShell. DOS was a
command line interpreter, enter command get output. Sure you could use
batch files, but in reality a batch file just entered the commands for you.
VBScript utilizes WSH (Windows Scripting Host); you can't enter VBScript
code in a command prompt. With PowerShell not only can you enter commands,
you can build script-blocks from the PowerShell command line. You will be
doing this in later tutorials.
Windows PowerShell Console
Let's take a look at the Windows PowerShell Console. Go to Start ->
Programs -> Windows PowerShell 1.0 -> Windows PowerShell
You can also launch PowerShell from a command prompt or in start -> run
by simply typing powershell
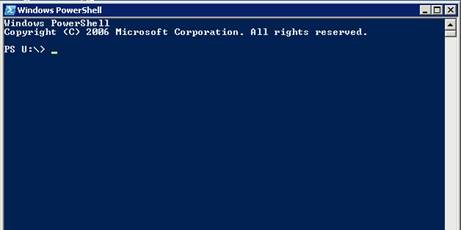
You will notice the command prompt PS U:\>
PS signifies that you are running PowerShell, U: is the drive letter of my
home directory. Yours may be different.
Exercise 1: Customize a shortcut to point to a home directory
As you have noticed my prompt points to U: Drive. I like to organize my
scripts in one location where I can access them quickly. U: is a drive
mapping to my home directory on a file server. I've chosen my file server
as it is backed up nightly. In this exercise we configure the PowerShell
Console to open in a directory called "MyScripts."
1. Create the following directory - C:\MyScripts.
2. Create a PowerShell shortcut on your desktop.
3. Right-Click on the shortcut and choose Properties.
4. Under the Shortcut tab locate the Start in: text box. Type in the path to the folder created in step 1. C:\MyScripts
5. Click Ok.
6. Launch PowerShell from the desktop shortcut.
PowerShell starts in the directory path we've chosen:

Feel free to choose the directory path of your choice. If your path has a space in it, don't forget to double-quote it. Example: "C:\Program Files\MyScripts." I will be working from the C:\MyScripts directory path throughout the tutorials.
Exercise 2: Customizing color and text-size
Remember the DOS prompt with the blue background and yellow text? Ok, I'm
dating myself but at least I didn't say monochrome. I'm going to change the
shortcut to those colors.
1. Right-click on the shortcut and choose Properties.
2. Choose the Colors tab.
3. You will see four radio buttons; Screen text, Screen background, Pop-up text, and Pop-up background. The Screen buttons are self-explanatory; the Pop-up buttons are for colors used in the History Buffer.
4. Set Screen text to yellow, Screen background to blue.
5. Launch PowerShell from the desktop shortcut.
PowerShell runs in the colors we've chosen:

Next I'm going to make the text larger so I don't have to squint.
1. Close the PowerShell Console by typing exit.
2. Right-Click the PowerShell shortcut and choose Properties.
3. From the Fonts tab, choose 12 x 16. Click OK.
4. Launch PowerShell from the shortcut.
Do you see the following? I mean can you really see it now?

Take a few minutes and play around with all the options in the shortcut's properties. Customize the shell to your preference. If you want to go back to the default text-size it is 8 x 12. You can also get to properties by clicking on the PowerShell icon in the upper left-hand corner. Just be aware that when you click "OK" you will be prompted to change the settings of the current window or to modify the shortcut.
Exercise 3: Editing Features in the PowerShell Console
In the last exercise of this tutorial I want to introduce some editing
features. I'm just going to list them and ask that you play around in the
console until you are comfortable with how they work.
First, enter the following commands at the command prompt (for this exercise, what the code does is not important):
get-acl <enter>
get-alias <enter>
get-command <enter>
get-date <enter>
Locate and type the keys below on the keyboard, watch what happens.
- Page Up - Jumps to the first command in the history buffer.
- Page Down - Jumps to the last command in the history buffer.
- Up Arrow - goes back one command in the history buffer.
- Down Arrow - goes forward one command in the history buffer.
- Home - Jumps to the beginning of the command line.
- End - Jumps to the end of the command line.
· Ctrl+LeftArrow - goes to the left one word at a time. (In the console type - PowerShell tutorial lesson 1)
· Ctrl+RightArrow - goes to the right on word at a time. (In the console type - PowerShell tutorial lesson 1)
- Tab - Completes input (in the console type get-c and press tab, press tab again...).
· F7 - Shows history buffer (use the up and down arrow keys to navigate the buffer).